Monday, August 1, 2011

What have I been crafting lately!?!

Long time no post! I have been very busy soaking up my last few days of summer vacation with my girls before the back to school crazies take over!! Unfortunately that is going to be here WAAAY too soon! 
The crafty things I am working on are no small projects....I am redoing an old bedroom set from my husband's Grandfather's house for Ginger's room. I have decided to "shabby chic" it...Here are pictures of before:
Pretty cute furniture to shabby chic, right? I have sanded all of it which has been a HUGE task. I am now getting ready to prime it...then the scary task of painting it! I keep telling myself that if it looks bad painted shabby chic-like I can always sand and repaint. I will keep you posted on the progress. My goal is to have this all redone by August 13th! BEFORE I have to go back to my real job of teaching....bummer! That is approaching waaaay too fast!

Sunday, July 17, 2011

Leather Bracelets


I LOVE the leather bracelets that I have seen everywhere for the last year but haven't wanted to pay the hefty price on the tag to buy one so I decided to figure out how to make them! I'm pretty proud that I've figured it out! AND they look pretty good I might add! Only some sore fingertips but other than that not that hard to do! 


 Want to make one too?? If so here is how:


supplies needed:
-black or brown leather chord
-waxed cotton cording in color of your choice
-silver or gold tone ball chain
-large washer or bead 


First you measure out the leather and the cotton cording. I measured my leather piece to be the length of my arm and cut. I made cut the cotton cord about 10" longer than the leather. Fold the leather in the middle to form a loop as pictured below:


Next take the cotton cord and hold the end about 1/2" from the top of the loop with the remainder of the cotton cord resting on the loop. See picture below
start wrapping the cotton cord around both leather pieces and the little piece of cord that you are holding. Wrap it around 4-5 times depending on how thick you want it to be.


Next add your bead chain. I cut my bead chain to be approximately 6 inches long. Set the bead chain in the middle of the 2 pieces of leather and on top of the cotton cord. Wrap the cotton cord tightly around the the chain in between the two balls. This is a little tricky to get started but once you wrap it a couple of times is super simple to complete...
Continue this process until the whole chain has been wrapped.
Now wrap the cotton cord around the leather 4-5 times like you did at the beginning of the bracelet. 
slip the bead of your choice onto the leather and cotton cords.
Then tie a knot. I used the pliers to pull the knot tight.
Clip off the remainder of the cord to desired length.
Slip the bead through the loop on the other end and you have your fancy new leather bracelet! Easy huh??!!


Want a kit to make the bracelet? Check out my etsy store to buy it!
http://www.etsy.com/listing/77960820/leather-and-cotton-cord-wrap-bracelet


Thursday, July 7, 2011

Personalized flying heart frame

I made this wooden flying heart frame today while Ginger was taking a nap...
I have 8 more available! 
Order one today! Makes a great gift! 
Personalize it! You tell me what you want it to say! 
$25.00 +$4.95 s&h
send me a message if you want to order one and I will send you a paypal invoice to pay! It's easy! 

rick-rack nick nack....rose

Make this adorable rick-rack rose...it takes about 15 minutes and all you need is rick-rack in the color of your choice, some straight pins, thread, needle, scissors, ruler, and your crafty hands!
 The first thing you need to do is measure out the rick rack. I used about 35", if you wanted a smaller rose use less.
Once you have the length you want to use fold it in half.
Start wrapping the pieces of rick rack around each other all the way to the end...I pinned the end down and the middle so that it was easier to wrap and would not twist on me as I was wrapping. 
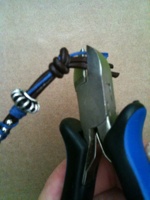
When you get to the end trim the pieces of rick rack.

You will start at the end of the rick rack and roll it. 

keep rolling it until you reach the other end of the rick rack and fold the end to the bottom of the rose.
I then took 2 straight pins and pinned the rose together so that it would stay in the rose shape while I sewed the rose together.
Take a threaded needle and sew the rose together. I made sure that the needle went completely through the whole rose a few times. Take out the straight pins and make sure that the rose is held together with the thread you have sewn. If needed sew a few more stitches to sturdy it. 

I decided to hot glue the rose onto a bobby pin. To finish off the back I cut a circle of material out the same circumference as the rose and hot glued it to the bobby pin. You can sew these cute little roses onto clothing, headbands, make a rick rack bouquet in all different colors...you name it! 


If you want a smaller rose use less rick rack, shorter length and smaller width rick rack. 
Want the supplies to make this rick rack rose or don't have time to make it yourself? check out my etsy store. You will be able to buy the DIY kit or the finished product!
DIY Kit on etsy

Wednesday, July 6, 2011

July 4th celebrations!

We had a wonderful time this past weekend in Rockport, TX with family! Here are some of the fun things we did and even squeezed in some craft time with the kids...
I made a onesie for Ginger...I called it "baby your a firework" shirt! We realized that she didn't have a July 4th shirt to wear in the kids group picture so I sewed this together in the car on the way down there...I think that it turned out pretty cute!
The older kids got to make their own shirts...each had a white t-shirt and fabric paint...the Moms had fun with this one too!


The picture of all the kids in their shirts turned out cute...trying to get this many kidos to look and smile at the camera at the same time is a photographers nightmare!! 

 We had fun fishing for trout


and kayaking around the bay... if you are ever in the market for a new kayak you HAVE to check out these new kayaks! They are so hard to turn over so the kids LOVE them because they feel safe in them...(parents love them too!) http://diablopaddlesports.com 
All in all it was a blast to be with family that we don't see enough of and believe it or not we actually got a cute little family picture taken! 
I hope that everyone had a fun and safe 4th too! Now I need to decide what new craft project I am going to tackle this week...keep a look out for a new creation. I better hurry up! its already Wednesday!! 


Tuesday, June 28, 2011

How to make Korker Ribbon & Korker Bows


How to make korker ribbon
Have you ever wondered how to get grosgrain ribbon to twirl and stay twirled and make those cute funky bows with it? Well I always did and so I figured out what to do to make it and I am going to share with you the secret to korker ribbon! 
Tools needed to make korker ribbon:


  • grosgrain ribbon in different colors
  • wooden dowels
  • wooden clothes pins
  • cookie sheet
  • oven
  • ruler
  • scissors
  • hair clips
The first thing you will do is preheat the oven to 275.


Next take the grosgrain ribbon and wrap it a couple of times around the wooden dowel and secure it to the dowel using the clothes pin as pictured below:
next wrap the ribbon down the dowel until you get to the bottom. I then secured the ribbon with the other clothes pin and cut the ribbon (make sure that you don't overlap the ribbon when you are wrapping the dowel)

After you have wrapped all the dowels and secured the ribbon on the dowels with the clothes pins set them on the cookie sheet and put them in the oven at 275 for 25 minutes.


You might smell a funky smell as the ribbon heats up but don't be alarmed, that is normal. Just watch the ribbon and make sure that its not getting too hot. The ribbon will turn darker as it heats, don't worry it will go back to the original color when it cools.
 Take the cookie sheet out after 25 minutes and let the dowels cool. Once completely cooled take the clothes pin off one end and unravel the ribbon. The spiral should stay in place once taken off of the dowels. VIOLA! korker ribbon!!


How to make korker bows:
First measure out the korker ribbon to be about 3" long
Next lay out the cut ribbons that you want to use in your bow ontop of another flat ribbon in a coordinating color. You will want between 25-30 precut ribbons laying on top of each other like pictured below:
Next you will tie the flat ribbon together like you are tying a shoe lace. Tie it in a tight knot. Now you have your cute-n-crazy korker bow! Attach the hair clip of your choice on the underside of the bow by tying it on the clip with the extra ribbon you used. I also hot glue the bow onto the clip for extra strength. Snip the extra ribbon off and you have an adorable bow for your little girls hair!

You can use different widths of ribbon to make these bows. The pink and green korker is made with 3/8" grosgrain and the light pink and white grosgrain ribbon is 1/8". I like to use this size for baby bows.


 Get KORKEY & Have fun! -Alana